Configuration Using Visual Studio IDE
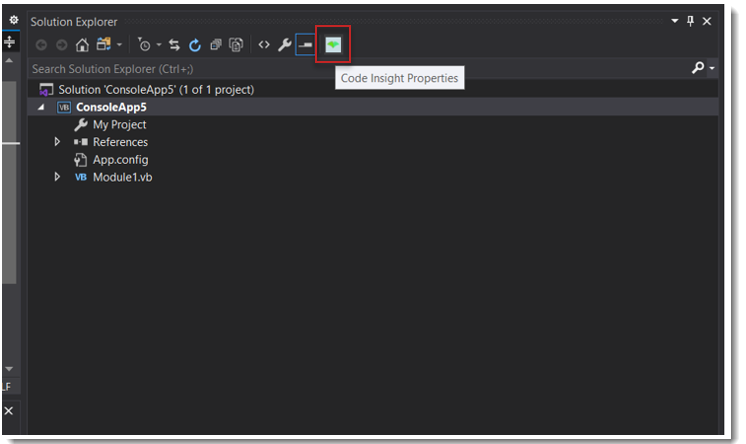
During the Visual Studio plugin installation, the Code Insight Properties icon![]() is added to the Solution Explorer toolbar in Visual Studio IDE. This icon provides access to the settings needed to configure the plugin at the solution level.
is added to the Solution Explorer toolbar in Visual Studio IDE. This icon provides access to the settings needed to configure the plugin at the solution level.
The following steps describe this configuration process.
To use the Visual Studio IDE interface to configure the Visual Studio plugin, do the following:
-
In Visual Studio IDE, open the Visual Studio solution that you intend to scan.

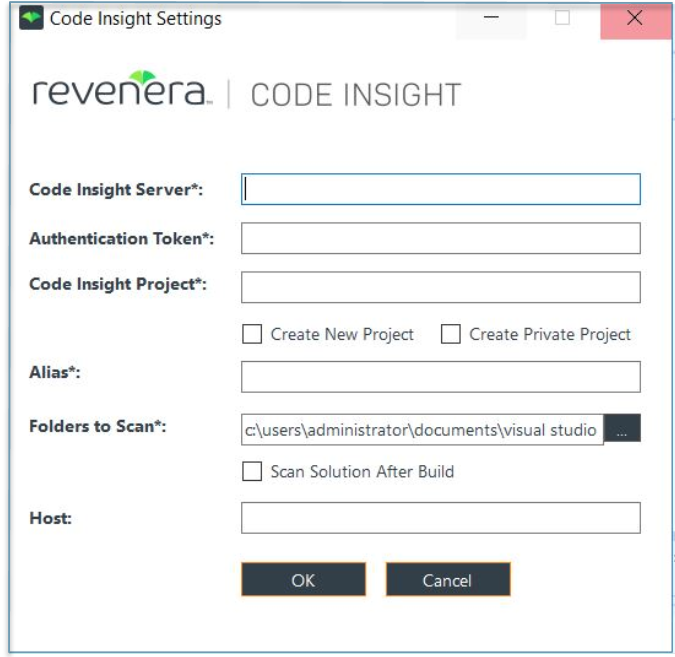
- The Code Insight Settings dialog is displayed.
- The Code Insight Settings dialog is displayed.
-
Complete the following fields on the dialog to configure the Visual Studio plugin for the current solution. All fields with an asterisk are required.
-
In the Solution Explorer toolbar, click the Code Insight Properties icon
.
| Field | Description |
|---|---|
| Code Insight Server | Enter the URL for the Code Insight core server in the format http://<SERVERHOSTNAME>:<PORT>/codeinsight/ (for example, http://codeInsightServer\.myorg\.org:8888/codeinsight/ ). Ensure that the URL is publicly accessible and that the port is available. |
| Authentication Token | Provide the JSON Web Token (JWT) used to authorize user access to the Code Insight functionality. You generate this token using the Code Insight Web UI and then copy and paste it in this field. For more information, see Providing an Authorization Token. |
| Code Insight Project | Enter the name of the Code Insight project that already exists or that you want this configuration process to create on the Code Insight server to store scan results. If you want the configuration process to create the specified Code Insight project, select Create New Project (see the next table entry). If the specified project already exists on the Code Insight server, do not select Create New Project or Create Private Project (see the next table entries). |
| Create New Project | Select this option if you want the configuration process to create a project in which to store scan results on the Code Insight server. The project is the name specified for Code Insight Project . The Project Owner is the user who generated the JWT provided for Authentication Token . If you want this new project to be public—that is, viewable by all Code Insight users—leave the next option, Create Private Project , unselected. Otherwise, select Create Private Project (described next). |
| Create Private Project | Select this option if you selected Create a New Project and want this new project to be a private—that is, accessible by only the Project Contact and users assigned to project roles. The Project Contact is the user who generated the JWT provided for Authentication Token . Leave this option unselected if you want the new project to be public. |
| Alias | A name that you define for the scan-agent plugin. The alias is used to represent the “container” (scan root) under which all the files scanned in this instance will be listed in the API output and in the file tree in the Analysis Workbench . This name must be unique within the project. |
| Folders to Scan | The auto-generated list of codebase folders to scan, based on the current output configuration of the Visual Studio project. To append additional codebase folders to scan, specify their absolute paths, separating each with a comma. This field is pre-populated with output directories for only those project types that have configuration support. For project types that do not support configuration, such as Silverlight or JavaScript, you must specify the absolute path for each folder to scan, separating each path with a comma. |
| Scan Solution After Build | Select this option to execute the Code Insight scan automatically after the Build or Rebuild Solution step. If this option is not selected, you must start each scan manually, as described in Executing a Scan. |
| Host | (Optional) A user-defined name for the instance where the scan-agent plugin is configured to run scans. This property along with the alias property will remain unchanged for each subsequent rescan. Although optional in general, this value is required if you are running the scan in a dynamic host environment. See Note About Rescans Performed by v2.0 and Later Plugins. |
- Click OK to save the plugin configuration.